Key Takeaways
Inground pool repair San Diego is most effective when it starts with verification and isolation—confirming whether water loss is evaporation or a leak, then narrowing the cause to the shell, plumbing, or equipment before choosing a repair path. A structured diagnostic process helps avoid expensive guesswork and clarifies when a targeted fix is reasonable versus when broader repairs may be more practical.
- Diagnose first, then repair: Pros typically move from a bucket test and visual inspection to dye testing, isolation tests, and pressure testing so the fix matches the actual failure instead of assumptions.
- Air bubbles usually point to suction-side issues: Air in returns or a pump that won’t stay primed often traces back to suction-side air leaks like lid O-rings, unions, or valves at the pad, so those should be checked before assuming an underground pipe failure.
- Surface and hardscape fixes have limits: Spot patching or regrouting can address small or localized defects, but color matching and long-term adhesion can be limitations on older surfaces, and recurring tile/coping failures may signal movement or moisture intrusion that should be evaluated.
Inground pool repair San Diego typically involves identifying leaks, surface damage, or failing equipment and matching the fix to the pool’s construction and plumbing layout. Common service calls include cracked plaster, chipped tile or coping, uneven decking, noisy pumps, and circulation problems caused by clogged lines, worn seals, or malfunctioning valves.
San Diego’s sunny climate can keep pools in frequent use, which accelerates wear on plaster finishes, tile grout, and mechanical components, while shifting soil and age can contribute to deck movement and underground leaks. Accurate troubleshooting matters because a small leak or suction-side air leak can lead to water loss, poor filtration, and premature equipment damage if left unaddressed.
This guide covers the most common inground pool problems, how professionals diagnose them (from pressure testing to dye tests and equipment inspection), and the repair options available—from patching and regrouting to replastering, pipe repair, and equipment replacement—so you know what to expect during evaluation, scheduling, and cleanup.
Common Inground Pool Problems in San Diego (and What They Usually Mean)
Most inground pool repair in San Diego starts with pattern recognition—where the water loss shows up, which surfaces are failing, and what the equipment is “telling” you through noise, pressure changes, or air bubbles. Understanding the likely causes helps you prioritize the right inspection before you commit to a repair plan.
While every pool is different (plaster vs. pebble finishes, skimmer layouts, cleaner lines, attached spas), many service calls fall into the same buckets: surface damage, plumbing leaks, circulation issues, and equipment wear. Some problems are cosmetic at first but become structural or mechanical if ignored—especially when leaks undermine soil under decks or when air leaks cause pumps to run hot.
- Water level dropping: Could be evaporation, a leak in plumbing, a crack at a fitting, or a failure in the shell or around penetrations (returns, lights, drains).
- Cracking or delamination: May indicate bond issues, movement, or aging plaster; not all cracks leak, but they can stain and widen.
- Loose or missing tile/coping: Often tied to bond failure, freeze-thaw in other climates, or in San Diego more commonly age, waterline chemistry, and minor deck movement.
- Cloudy water despite “good chemistry”: Can point to circulation/filtration problems, a failing pump, clogged filter media, or bypassing valves.
- Air bubbles in returns or pump basket not staying full: Frequently suction-side air leaks (lid O-ring, unions, valves) that reduce performance and strain equipment.
How Pros Diagnose Leaks and Circulation Issues
Accurate troubleshooting is the difference between a targeted fix and expensive guesswork. A typical evaluation combines visual inspection, simple isolation tests, and specialized tools like dye, pressure testing, and electronic locating when needed.
Because pools are integrated systems (shell + plumbing + equipment), a good diagnostic approach narrows down the problem step-by-step. For example, a drop in water level can be confirmed by a bucket test before any invasive work begins, and plumbing segments can be isolated to identify which line is failing.
Leak Confirmation: Rule Out Evaporation First
Before assuming a leak, technicians often start with an evaporation comparison to avoid unnecessary repairs. This is especially relevant in warm, breezy conditions where evaporation can be significant.
- Fill a bucket with pool water and set it on a step so the bucket’s water level is close to the pool’s water level.
- Mark both water levels and run the system normally for 24 hours.
- Compare the drop in the bucket to the drop in the pool.
If the pool drops more than the bucket, a leak becomes more likely—but the next step is identifying whether it’s in the shell, plumbing, or equipment.
Dye Testing: Pinpointing Small Shell or Fitting Leaks
Dye tests help confirm a suspected leak point by showing water movement into a crack or gap. It’s most useful for visible areas like around lights, returns, skimmers, and tile lines.
- Best conditions are calm water and the pump off so the dye isn’t dispersed by circulation.
- Common test points include light niches, skimmer throats, return fittings, main drain covers (where accessible), and cracks.
- A dye test can confirm “where” water is going, but it doesn’t always explain “why” it’s leaking (movement, failing sealant, cracked fitting).
Pressure Testing: Isolating Underground Plumbing Leaks
Pressure testing checks whether a specific line can hold pressure, helping locate leaks in underground plumbing runs. It’s often the most direct method for return lines, skimmer suction lines, cleaner lines, or spa loops.
Because valves, check valves, and multiport assemblies can complicate results, competent testing isolates the line segments carefully. If a line fails, additional locating steps may be needed to reduce demolition—especially when the leak is under decking.
Equipment Inspection: Matching Symptoms to Failing Components
Noisy pumps, low filter pressure, frequent priming issues, or air in the basket often point to worn seals, lid O-rings, valve stems, or clogged baskets/impellers. A methodical inspection can reveal whether a repair is minor (seal and gasket replacement) or if replacement is more cost-effective.
- Pump: Listen for bearing noise, check for shaft seal leaks, inspect lid O-ring and unions for air leaks.
- Filter: Evaluate pressure rise after cleaning, look for internal damage (grids/cartridges), check backwash or air relief function where applicable.
- Heater: Verify flow requirements are met; low flow can trigger errors or short-cycling.
- Valves: Check diverter seals and stems for seepage; sticky valves may indicate worn internals.
Repair Options: Surface, Tile, Coping, Decking, and Structural Issues
Surface and hardscape repairs range from small patches to full resurfacing, depending on the extent of damage and how well surrounding materials are bonded. The right solution considers the pool finish type, the age of the surface, and whether movement or water intrusion is driving the failure.
Plaster Cracks, Roughness, and Staining
Plaster is a wear surface, and in frequently used pools it can become rough, etched, or discolored over time. Repairs can be localized, but color matching and long-term adhesion can be limitations with small patches on older surfaces.
- Spot patching: Can help with small defects or chips but may not blend perfectly.
- Crack treatment: Depends on whether the crack is structural, superficial, or actively leaking; some cracks require more than cosmetic filler.
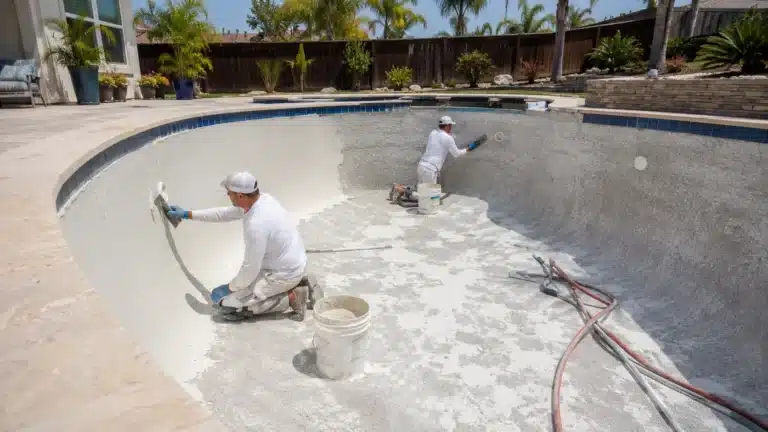
- Full resurfacing: Considered when widespread etching, delamination, or roughness affects comfort and sanitation; prep quality strongly affects lifespan.
Decision factors include how widespread the defects are, whether the pool has persistent algae harbor points in rough areas, and whether the surface is nearing the end of its service life.
Tile and Grout Repairs at the Waterline
Waterline tile problems typically show up as loose tiles, hollow spots, missing grout, or calcium buildup lines. Fixes may include regrouting, re-setting tile sections, or addressing underlying bond issues.
- Regrouting: Useful when tile is solid but grout is failing or eroding.
- Re-setting tile: Needed when tiles are loose or have lost adhesion.
- Addressing calcium scale: May involve cleaning methods chosen carefully to avoid damaging tile, grout, or nearby finishes.
If tiles are popping off repeatedly in the same zone, the cause may be movement, moisture behind the tile line, or improper bonding layers—issues that should be evaluated before repeating the same repair.
Coping and Deck Movement
Chipped coping, opened joints, and uneven decking can be cosmetic, but they also allow water intrusion that undermines the base and can worsen settlement. Repair options range from joint sealant work to resetting coping sections or addressing drainage.
- Expansion joint maintenance: Replacing failed sealant can help keep water from saturating soil below decks.
- Spot leveling or reset work: When coping stones or sections have shifted, localized reset may be possible.
- Drainage improvements: Redirecting runoff and improving deck drainage can reduce recurring movement and erosion.
Because deck issues are site-specific (soil, slope, drainage paths), a repair plan should acknowledge uncertainty—sometimes movement slows after stabilization, and sometimes it continues and requires additional phases.
Plumbing Repairs: Skimmers, Returns, Main Drains, and Cleaner Lines
Plumbing repairs focus on restoring a sealed, air-tight suction side and a leak-free pressure side. The approach depends on where the failure is located and how accessible it is without excessive demolition.
Underground leaks may show up as soggy spots, air in the system, or unexplained water loss. In other cases, the leak is at a fitting near the equipment pad, where repairs can be straightforward.
| Pool System Area | Typical Symptoms | Repair Considerations in San Diego |
|---|---|---|
| Suction-side plumbing (skimmer/main suction) | Air bubbles at returns, pump losing prime, noisy pump | Start with lid O-ring, unions, and valves at the pad before assuming underground pipe failure |
| Return-side plumbing | Water loss, wet soil near lines, reduced jet strength | Pressure testing can isolate the failing line and reduce unnecessary deck/demo work |
| Skimmer body/throat | Water loss stabilizing near skimmer level, cracks around skimmer | Repairs may involve sealing, throat repair, or replacement depending on crack location and bond |
| Light niche and conduit | Leak indications near light, dye drawn into niche | Requires careful sealing methods; electrical components should be handled by qualified pros |
| Cleaner / auxiliary lines | Weak cleaner performance, pressure changes, water loss | Valves and wall fittings are common failure points; line isolation helps confirm underground leaks |
Spot Repairs vs. Reroutes
Once a line leak is confirmed, the repair may be a localized excavation and coupling repair or a partial reroute to avoid cutting through large deck sections. The best choice depends on where the leak is and how much access is required.
- Spot repair: Often preferred when the leak location is well-defined and accessible.
- Reroute: Can make sense if the line has multiple weak points, if access is difficult, or if it avoids major deck demolition.
- Fitting repairs at the pad: Sometimes the “leak” is a dripping union, cracked valve housing, or failing check valve—repairs that are far less invasive than underground work.
Equipment Repairs and Replacements: Pumps, Filters, Heaters, and Valves
Equipment problems often overlap with water-quality complaints because poor circulation reduces filtration and sanitizer distribution. Repair decisions typically balance part replacement (seals, gaskets, cartridges) against the condition and age of major components.
Pump and Motor Issues
Common pump-related repair calls include priming failures, loud operation, leaks at the seal plate, and reduced flow. Some issues are caused by upstream restrictions (clogged baskets, blocked impeller) rather than motor failure.
- Prime loss: Check lid O-ring condition, water level, skimmer weir function, and suction-side fittings for air leaks.
- Low flow: Inspect baskets, impeller, filter condition, and partially closed valves.
- Water dripping at the pump: May indicate shaft seal failure or union/plug leaks.
Filter Performance Problems
Filters don’t usually “go bad” suddenly—more often, performance drops due to dirty or damaged media or internal component wear. A tech will usually confirm whether pressure behavior matches the filter type and condition.
- Cartridge filters: Need cleaning and eventual replacement of cartridges when fabric wears or bands break.
- DE filters: May require grid inspection, manifold checks, and correct recharge procedures.
- Sand filters: Can need sand replacement over time; channeling and worn laterals can reduce effectiveness.
Valves, Automation, and Flow Control
Stiff valves, internal leaks, and poor water feature performance are often tied to diverter seals, actuators, or misbalanced return paths. Fixes may be as simple as rebuilding a valve or recalibrating actuator stops.
Because equipment pads can be configured many ways, documenting valve positions and labeling lines during repair helps avoid future confusion—especially when multiple bodies of water (pool/spa) share equipment.
What to Expect During an On-Site Pool Repair Visit
Most repair appointments follow a predictable sequence: inspection, testing, diagnosis, then a repair plan with options. Knowing the workflow helps you prepare access to equipment and understand why some repairs require follow-up visits.
- Initial interview: What changed recently (water loss timing, new noise, chemical adjustments, recent storms, deck work).
- Visual inspection: Equipment pad, pool shell, tile line, skimmer, returns, and visible plumbing.
- Testing: Dye, isolation tests, pressure testing, and verification of flow/pressure behaviors.
- Repair recommendation: One or more repair paths, with limitations explained (for example, patch blending or leak location uncertainty).
- Scheduling and access planning: Especially for deck cuts, excavation, or cure times for surface materials.
Cleanup expectations depend on the scope—equipment pad work is typically tidy, while plumbing repairs under decking can involve saw cutting, debris removal, and temporary surface restoration until final patching is complete.
Choosing the Right Fix for Your Pool (Not Just the Fastest One)
The best inground pool repair San Diego homeowners can pursue is the one that addresses the root cause and matches the pool’s remaining service life. A quick patch may be reasonable for a short-term goal, while long-term ownership often benefits from more comprehensive repairs.
- Scope alignment: If multiple issues stem from aging surfaces, combining repairs (tile + surface + fittings) can reduce repeated drain/refill cycles.
- Access and disruption: A reroute may be less disruptive than cutting a large section of deck to reach a deep leak location.
- Material compatibility: Some sealants, mortars, and patch materials perform better when matched to the existing finish and exposure conditions.
- Risk tolerance: When leak location is probable but not definitive, ask what verification steps can reduce uncertainty before demolition.
If you want to understand how repair timelines compare to full construction schedules, see how long it does it take to build a swimming pool for a realistic sense of sequencing, curing, and coordination.
Planning Your Next Steps: From Targeted Fixes to Full Pool Repair Projects
Once you’ve confirmed the issue—surface failure, a plumbing leak, or equipment breakdown—the next step is choosing a repair path that restores reliability and minimizes repeat problems. For broader issues or multiple failures at once, it can help to review a dedicated pool repair project overview to see how multi-part repairs are commonly organized.
For many homeowners, the most cost-effective approach is to start with verification and isolation—confirm the leak location, confirm the failing component, and then repair only what’s necessary. Pools are engineered systems, and a change in one area can affect others, so a structured diagnostic and repair process is usually the fastest route back to stable water level, quiet operation, and consistent circulation.
For background on pool system components and typical design elements, you can also review general swimming pool information to better understand how shells, plumbing, and equipment work together during diagnosis and repair.
Keeping Repairs From Becoming Repeat Repairs
Many recurring pool problems come from small issues that weren’t addressed during the first fix—like an unsealed joint allowing water intrusion, a slow suction-side air leak, or chemistry that accelerates surface wear. A few practical habits can reduce the chance that the same repair returns.
- Track water level changes: Note how much the pool drops per day and whether it stabilizes at a specific height.
- Listen for early equipment changes: New rattles, whining, or frequent priming can indicate developing seal or air-leak issues.
- Maintain seals and O-rings: Small gasket and O-ring replacements can prevent bigger pump and plumbing problems.
- Address deck joints and drainage: Keeping water from saturating soil around the pool can reduce movement-related damage.
- Re-evaluate after repairs: After a fix, confirm the symptom is truly gone (steady water level, stable pressure, no new air in the system).
When you approach inground pool repair in San Diego with a diagnose-first mindset, you’re more likely to get a durable outcome—whether that’s a tight plumbing system, a safer deck edge, or a finish that’s comfortable and easier to keep clean.
Frequently Asked Questions
How can I tell if my pool is leaking or just losing water to evaporation?
Use a bucket test to compare the pool’s water drop to a bucket of pool water over 24 hours. If the pool drops more than the bucket, a leak is likely. Next, isolate whether it’s shell, plumbing, or equipment related.
What do air bubbles in the returns or a pump that won’t stay primed usually mean?
Air bubbles typically indicate a suction-side air leak rather than a pressure-side water leak. Common causes include a worn pump lid O-ring, loose unions, or leaking valves near the equipment pad. A methodical inspection helps avoid unnecessary underground work.
How do professionals locate underground plumbing leaks during inground pool repair in San Diego?
Pros usually locate underground leaks by pressure testing individual lines after isolating them with valves and plugs. If a line won’t hold pressure, additional locating steps may follow to reduce demolition. This approach helps pinpoint return, suction, or cleaner-line failures.
When is spot patching plaster reasonable, and when is resurfacing the better choice?
Spot patching is reasonable for small chips or isolated defects when surrounding plaster is well bonded. Resurfacing is usually better when roughness, etching, delamination, or widespread staining affects comfort and cleanliness. Color matching and adhesion limits often reduce patch longevity on older finishes.
What should I expect during an on-site inground pool repair visit in San Diego?
Expect a step-by-step evaluation that moves from inspection to testing, then a repair plan with options. Technicians typically review recent changes, inspect the equipment pad and pool surfaces, and use methods like dye tests or pressure testing. Cleanup depends on whether demolition is required.
Get Clear Answers on Your Inground Pool Repair—Before You Commit to a Fix
If you’re dealing with unexplained water loss, rough or cracking plaster, loose tile, or a pump that won’t stay primed, the next best step is a focused evaluation that separates surface issues from plumbing or equipment problems. A clear diagnosis helps you avoid paying for repairs that don’t address the real cause and reduces the chance of repeat visits.
Professional testing and inspection can pinpoint where the problem is coming from, outline practical repair options, and explain what access or downtime may be needed—so you can plan confidently and protect your pool and surrounding deck.
Request an on-site assessment from Baja Pool Plaster.